


ESP-01 NanoBoard (ESP8266)
### DESCRIPTION
The ESP-01 NanoBoard is a little "motherboard" for the well known ESP-01 modules (ESP8266) with some features for an easy use: on board serial-USB adapter (CH340), voltage regulator with polyfuse on USB, external power connector, rugged USB B connector, optional 16x GPIO expander, I2C connector, ESP-01 GPIO connector, expander connectors, automatic upload circuitry (Arduino IDE), configurable User key, Reset key, various control leds.
The idea was to reuse the ESP-01 for a board easy to program, ideal for beginners and classrooms.
### TECHNICAL DETAILS / COMPONENTS
The video shows the NanoBoard in action, loading a blink demo program using the Arduino IDE (Windows 10 host). The upload process do not require to press any key (like for the well known NodeMCU).
Please note that you need before to set "nodemcu" (instead of the default "ck" ) as "Reset Method" inside the "Tools" menu of Arduino IDE.
The optional expander
The ESP-01 NanoBoard has an optional 16x GPIO expander (see the
schematic). If you decide not to want it, just not to populate the
components inside the dotted optional part of the schematic.
Here it is a NanoBoard "lite", without the optional expander:

How to configure User key with solder jumpers (SJ1/SJ2)
The User key can be configured to act as the FLASH key of the nodeMCU (key connected to ESP-01 GP0IO) or as a generic user key connected to the GPA1 port of the GPIO expander (MCP23017).
Using Arduino IDE the second choice seems to be better, of course only if you have populated the GPIO expander.
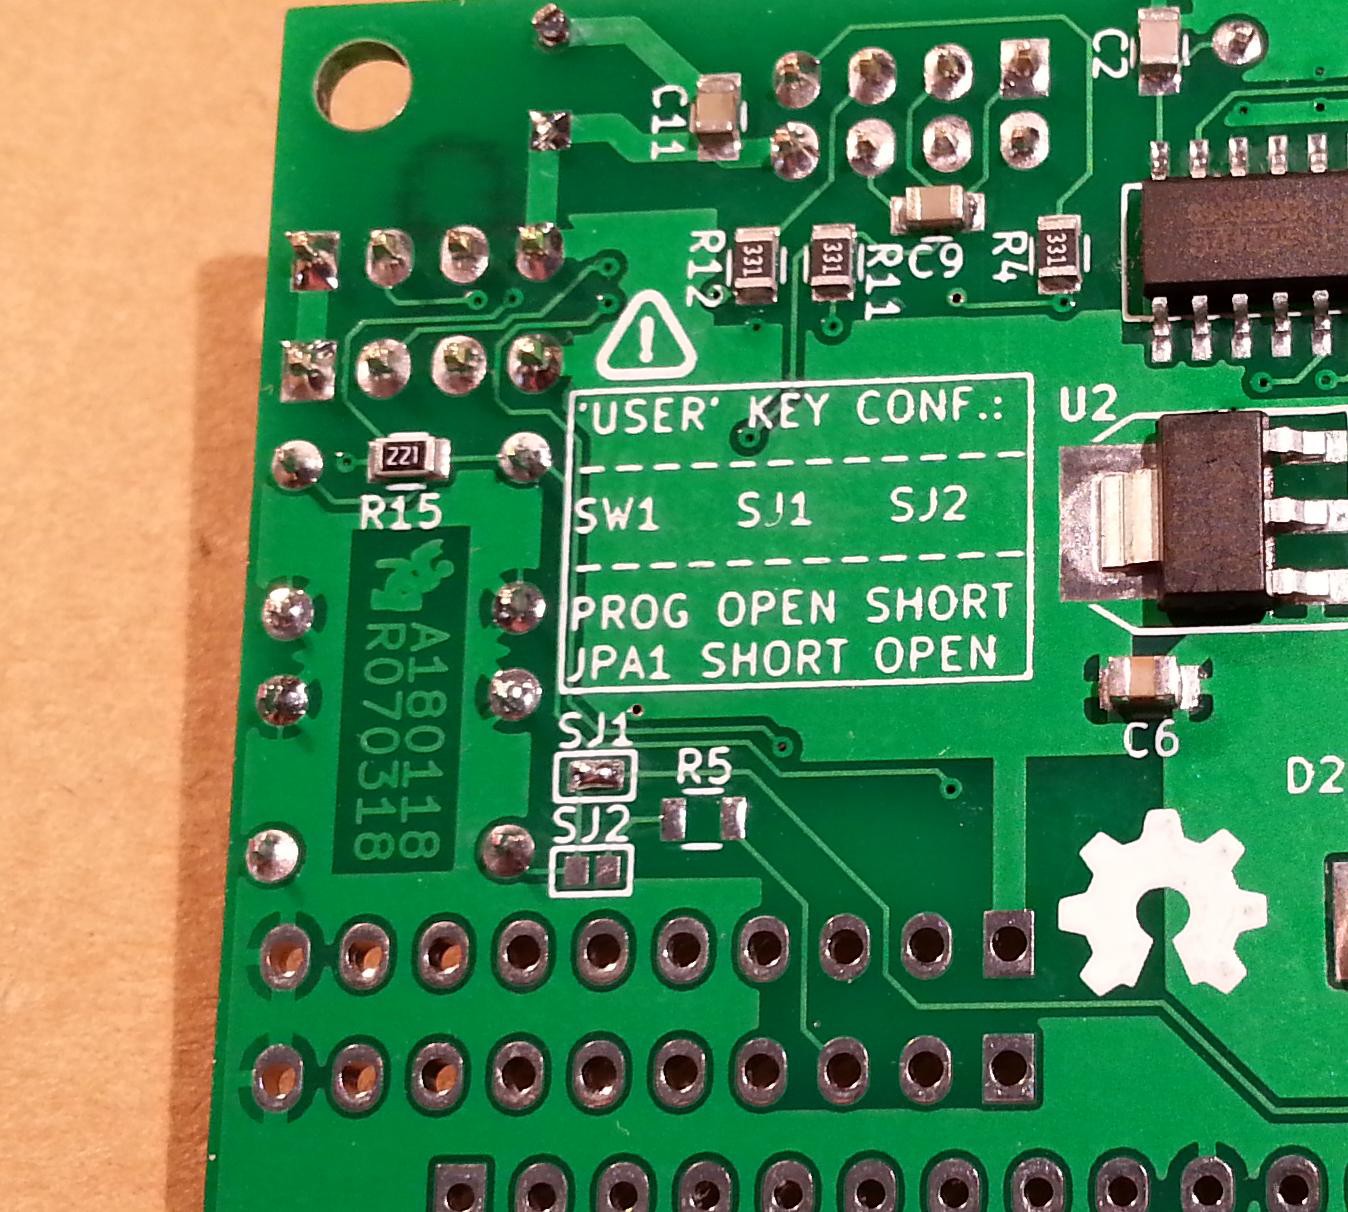
To configure the User key there are two solder jumpers (SJ1 and SJ2) in the back side of the PCB:
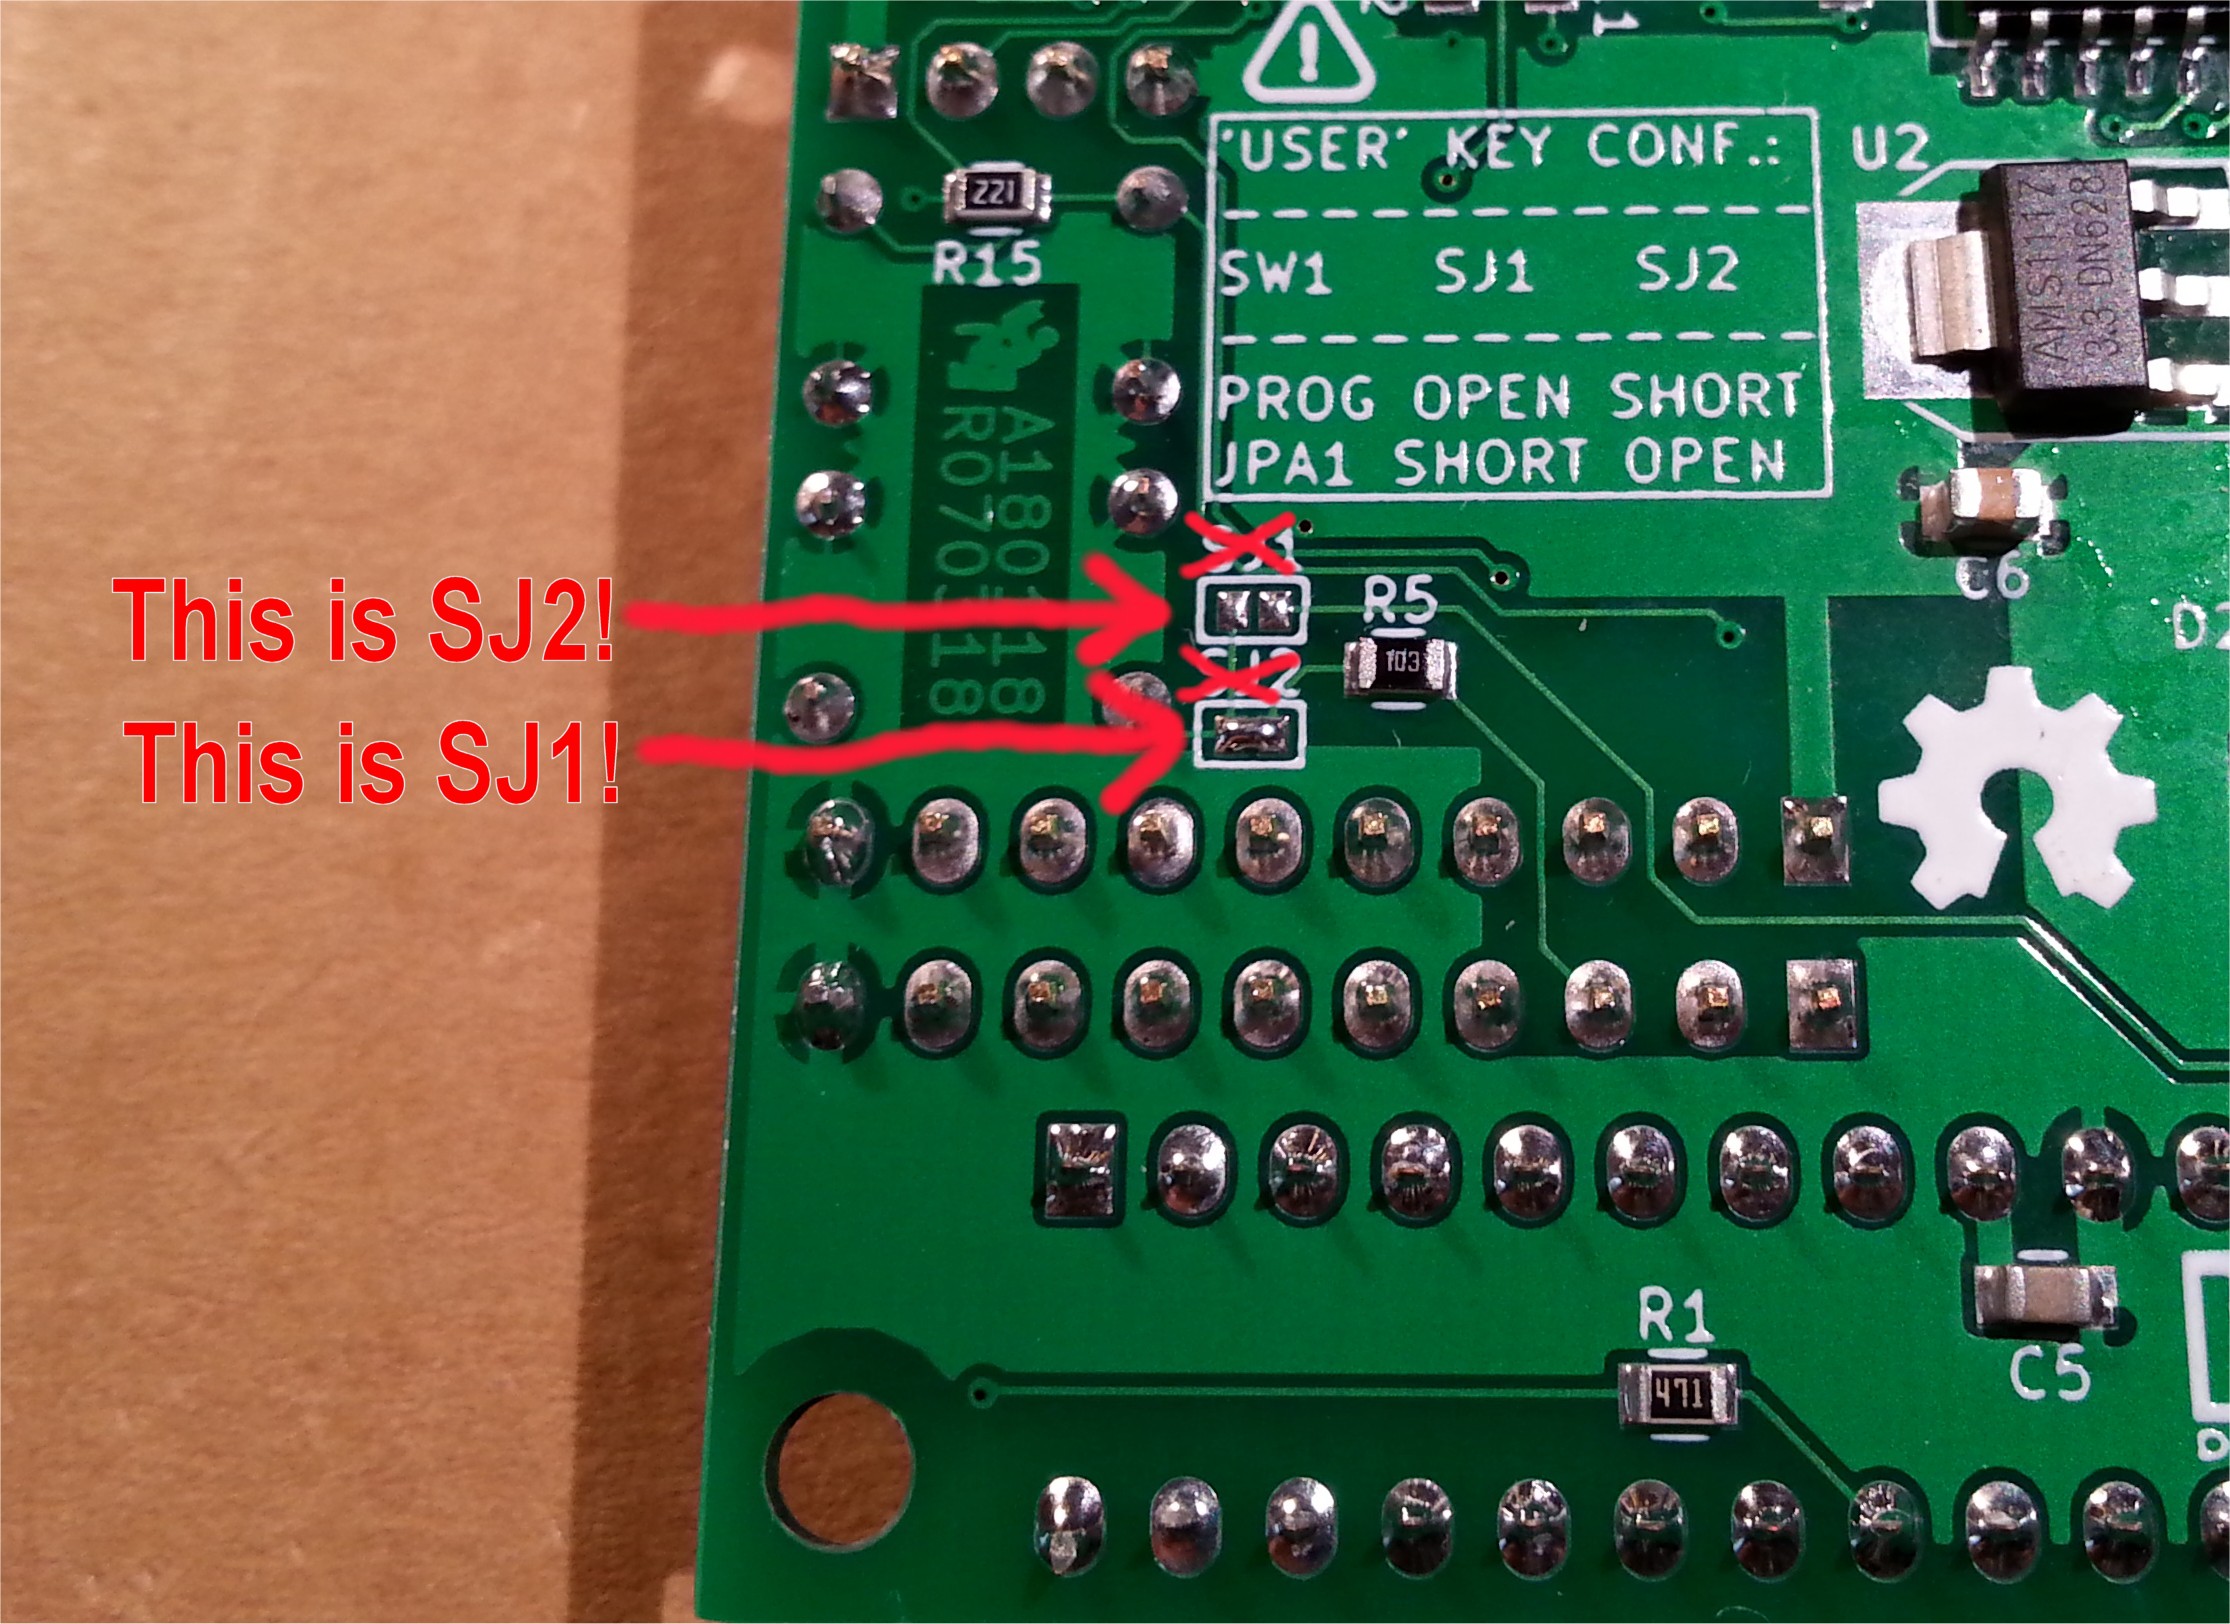
Note that the references SJ1 and SJ2 on the PCB are swapped. The photo shows the right position.
The table written near the two solder jumpers shows the two possible configurations.
In the previous photo the User key is configured (SJ1 shorted) to be connected to the GPA1 pin of the GPIO expander (see the schematic).
In the following photo the User key is configured to be connected to the ESP-01 GPIO0 pin (SJ2 shorted). In this case this is the only choice because the GPIO expander is not populated on the PCB:
### LEARN / TOPIC / BUILD INSTRUCTIONS
Here all the links to all you need to buid the board, including a demo program for the Arduino IDE:
ESP-01 NanoBoard (ESP8266)
*PCBWay community is a sharing platform. We are not responsible for any design issues and parameter issues (board thickness, surface finish, etc.) you choose.


- Comments(1)
- Likes(0)
 More by Engineer
-
 ESP-01 NanoBoard (ESP8266)
### DESCRIPTIONThe ESP-01 NanoBoard is a little "motherboard" for the well known ESP-01 ...
ESP-01 NanoBoard (ESP8266)
### DESCRIPTIONThe ESP-01 NanoBoard is a little "motherboard" for the well known ESP-01 ...
-
 Z80-MBC2: 4ICs homemade Z80 computer
### DESCRIPTIONThe Z80-MBC2 is an easy to build Z80 SBC (Single Board Computer with 8MHz Z80, 128kB ...
Z80-MBC2: 4ICs homemade Z80 computer
### DESCRIPTIONThe Z80-MBC2 is an easy to build Z80 SBC (Single Board Computer with 8MHz Z80, 128kB ...
-
 Z80-MBC: A 4 ICs Z80 computer
### DESCRIPTIONThis is the Z80-MBC (Multi Boot Computer), a mini 4MHz Z80 64kB RAM system with Bas...
Z80-MBC: A 4 ICs Z80 computer
### DESCRIPTIONThis is the Z80-MBC (Multi Boot Computer), a mini 4MHz Z80 64kB RAM system with Bas...
-
 CPLD Fun Board: Arduino STM32F103 and Altera MAX II CPLD
### DESCRIPTIONTwo dev boards into one: a STM32 based Arduino ("Maple Mini" compatible) ...
CPLD Fun Board: Arduino STM32F103 and Altera MAX II CPLD
### DESCRIPTIONTwo dev boards into one: a STM32 based Arduino ("Maple Mini" compatible) ...
-
-
-
-
Enter the title_ of your projectEnter the title_ of your projectEnter the title_ of your projectEnter the title_ of your projectEnter the title_
12 0 0 -
-


